Saturday, November 10, 2012

Chocolate Chip Scones

While not necessarily traditional English Scones, these are very tasty, especially when fresh out of the oven. If you don't want to use chocolate chips, feel free to leave them out, or substitute them for 1/2 cup currants or raisins.

Chocolate Chip Scones
Adapted from Betty Crocker "Baking Basics"
8 servings

Ingredients:
1 3/4 cup all-purpose flour
3 tbsp sugar
2 1/2 tsp baking powder
1/2 tsp salt
1/3 cup cold unsalted butter (5 1/3 tbsp)
1 egg
1/2 tsp vanilla extract
4-7 tbsp whipping cream, plus an additional 1 tbsp
1/2 cup miniature semi-sweet chocolate chips
2 tsp white decorator sugar crystals or granulated sugar

1. Preheat oven to 400F degrees.

2. In a large bowl, stir flour, 3 tbsp sugar, baking powder, and salt until mixed. Cut in the butter, using either a pastry blender or two knives, until the mixture looks like fine crumbs.

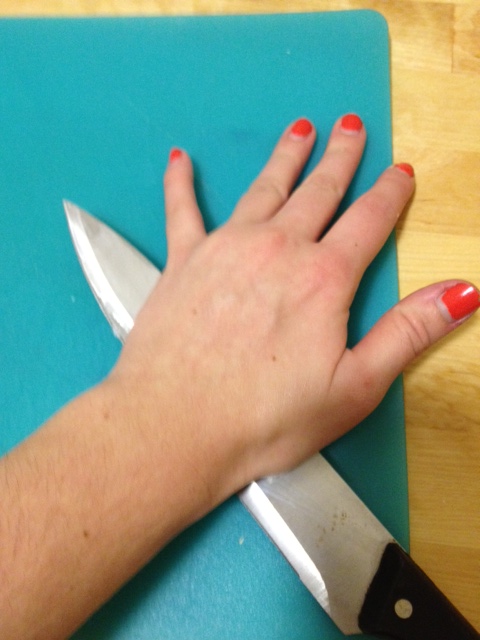
If using two knives to cut in butter, make sure to run them past one another as demonstrated. This is also a great arm workout!
3. In a small bowl, beat egg until yolk and white are well mixed. Using a fork, stir the egg, vanilla extract, chocolate chips, and one tbsp of whipping cream at a time into the flour mixture until it starts to form a soft dough and leaves the sides of the bowl. After adding 6 tbsp of whipping cream, I replaced the fork with my hands and the process went a lot of faster, so don't be afraid to get dirty.

4. Lightly sprinkle flour over a cutting board or counter top. Place dough on floured surface and gently roll in the flour to coat. Gently kneed dough about ten times, or for roughly 1-2 minutes until the it feels springy and smooth.

5. Place the dough on an ungreased cookie sheet (or in my case pizza pan). Pat dough with fingers into an 8 inch round. Using a sharp knife (or pizza cuter) dipped in flour, cut dough into eight wedges, but do not separate them. Brush wedges with 1 tbsp whipping cream and sprinkle with sugar crystals.

6. Bake 14-16 minutes or until light golden brown. Immediately remove from cookie sheet (or pizza pan) to a cooling rack. Serve warm, though they are still tasty the next day.

7. Enjoy!


Nutritional Info per Serving:
Calories 314; Total Fat 17g; Cholesterol 67mg; Sodium 329mg; Total Carbs 35g; Protein 5g

Friday, November 9, 2012

Marinara Sauce

One of my biggest pet peeves in the kitchen is when a recipe calls for a miniscule amount of one ingredient, but you can only buy it in a larger, non-resealable quantity at the store. For example, earlier this week I made Shepherd's Pie, which called for 2 tsp of tomato paste, though the smallest container I could find was 6 oz, which contained roughly 10 tbsp of tomato paste, so needless to say, I had some leftover. Not wanting them to go to waste, I decided to make some marinara sauce, which could then be easily frozen for later enjoyment.

Marinara Sauce
Adapted from Betty Crocker "Heart Health Edition Cookbook"
3 cups (roughly 12 servings)

Ingredients:
1 14.5 oz can diced tomatoes
1 8 oz can tomato sauce
1 6 oz can tomato paste
1/2 onion, chopped
4 garlic cloves, minced
1/2 tbsp olive oil
1 tsp sugar
3/4 tsp dried basil leaves
1/2 tsp dried oregano leaves
1/2 tsp black pepper
1/4 tsp salt

1. In a saucepan, stir all ingredients until well mixed.

2. Heat to boiling. Reduce heat to low, cover, and simmer for roughly 30 minutes, stirring occasionally.

3. Optional Step: If you don't like a chunky marinara sauce, once done, use a food processor to smooth sauce.

4. Either use sauce right away, refrigerate for two weeks, or freeze for up to one year.

5. Enjoy!

Preparing the sauce for freezing!

Nutritional Info per Serving (each serving roughly 1/4 cup):
Calories 33; Total Fat 1g; Cholesterol 0mg; Sodium 65mg; Total Carbs 6g; Protein 1g

Potato Pancakes

As a native downstate New Yorker I'm ashamed to admit I've never made homemade potato pancakes until this week, when I was looking for something to go with my applesauce. I guess I've always had some fear of completely ruining these pancakes, along with some concern on how best to work with shredded potatoes. But thankfully those concerns were addressed last week while I laid sick on my couch, watching mindless afternoon television. As I flipped through my paltry 20 channels (most of which are duplicates), I happened upon The Chew, a cooking talk show I had heard about, but had never watched before. In this episode, the hosts were making meals out of mystery grocery bag ingredients, one of which included potatoes. As it happened, they were going to be making some sort of skillet hash, and needed to use shredded potatoes, it was at this moment that I learned how best to dry shredded potatoes. This was quite the revelation to me, though my brother, who's a chef, jokingly mocked me about this last night as I excitedly told him about this new cooking technique I discovered. So, with this new knowledge and a big bowl of homemade applesauce, I set out to make some potato pancakes!

Potato Pancakes
Adapted from Betty Crocker "Country Cooking"
2 Servings

Ingredients:
3/4 lb baking potatoes
2 eggs
1/2 onion, finely chopped
1/8 cup all-purpose flour
1/2 tsp salt
2 tbsp vegetable oil

1. Shred potatoes. Rinse well; drain and pat dry. I suggest using a colander to rinse the shredded potatoes in, and then using a clean kitchen towel to wring them dry with. The best way to do this is to place the shredded potatoes in the center of the towel, and then wring them tightly dry either over the sink or trash can, just as you would wring out a wet towel.

2. In a medium bowl, beat the eggs. Add the potatoes, onion, flour, and salt. Stir with a whisk to combine. Between making each pancake you are going to want to re-stir the mixture, as the liquid will separate from the potatoes, as shown below.

3. In a 12-inch skillet, heat 1 tbsp of the oil over medium heat. Using a 1/4 measuring cup, scoop out the potato mixture for each pancake. While the original recipe indicates you should get 8 pancakes, I got 4, and I didn't overfill the measuring cup, so I'm not sure why there was such a discrepancy, but you may want to keep this in mind. Once you have placed the mound of potatoes in the skillet, gently flatten with a spatula to about a 4-inch diameter.

4. Cook pancakes about 1:30-2 minutes on each side, or until golden brown. As each pancake finishes place them on a paper towel lined plate, with a layer of paper towel between each pancake to adsorb some of the excess oil.

5. Repeat process until there is no more remaining mixture, adding oil as needed. I wound up needing 2 tbsp of oil total.

6. Enjoy!


Nutritional Info per Serving:
Calories 338; Total Fat 19g; Cholesterol 215mg; Sodium 658mg; Total Carbs 36g; Protein 11g

Wednesday, November 7, 2012

Applesauce Cake

Applesauce Cake
Adapted from Betty Crocker "Baking Basics"
15 servings

Ingredients:
2 1/2 cups all-purpose flour
1 1/2 cups applesauce
1 1/4 cups granulated sugar
1/2 cup unsalted butter (8 tbsp), room temperature
1/2 cup water
1 1/2 tsp baking soda
1 1/2 tsp salt
3/4 tsp ground cinnamon
1/2 tsp ground cloves
1/2 tsp ground allspice
1/4 tsp baking powder
2 eggs
Vanilla Buttercream Frosting

1. Preheat oven to 350F degrees. Spray the bottom and sides of a 13x9 inch pan with cooking spray.

2. In a large bowl beat all ingredients together until well combined, stopping several times to make sure to scrape the sides of the bowl.

3. Pour batter into pan, making sure it spreads evenly and is smooth on top.

4. The original recipe calls for the cake to be baked for 45-50 minutes, but mine was done in about 25 minutes, so you might want to check it almost halfway through with a toothpick to see how done it really is. When done a toothpick inserted in the center should come out clean.

5. Cool completely in pan on a cooling rack, at least for one hour before frosting.

6. Once cool, frost the cake.

7. Enjoy!


Nutritional Info per Serving (not including frosting):
Calories 207; Total Fat 7g; Cholesterol 45mg; Sodium 382mg; Total Carbs 35g; Protein 3g

Vanilla Buttercream Frosting

This frosting can be a bit temperamental in my experience, but when it comes out well, it's really good. My best advice is to repeatedly taste the frosting while making it to get the perfect balance of creaminess and taste, and don't be worried about adding more milk or vanilla as needed.

Vanilla Buttercream Frosting
Adapted from Betty Crocker "Baking Basics"
15 servings (enough for a 13x9 inch cake)

Ingredients:
1/3 cup unsalted butter (5 1/3 tbsp), room temperature
3 cups powdered sugar
1 1/2 tsp vanilla
2 tbsp and 1/2 tsp milk

1. In a medium bowl, mix the powdered sugar and butter on low speed with an electric mixer. My best advice for doing this without making a huge mess, is to actually also add the vanilla and milk at the same time, which allows the frosting to take shape while the butter is being creamed.

2. Once the initial ingredients are well mixed, taste the frosting and check its texture with a spatula. The frosting should be smooth enough to be easily spreadable on the cake, if it is not smooth enough add milk and vanilla extract as needed, making sure to taste after each addition to get the proper balance between the milk, butter, sugar, and vanilla.

3. Enjoy!


Nutritional Info per Serving:
Calories 133; Total Fat 4g; Cholesterol 11mg; Sodium 2mg; Total Carbs 24g; Protein 0g

Fresh Applesauce

Fresh Applesauce
Adapted from the American Girls "Kristen's Cook Book"
6 servings (roughly 1/2 cup each)

Ingredients:
8 apples (I used Macintosh, but the original recipe suggests using Granny Smith)
1 cup cold water
1 tsp cinnamon

1. Rinse, peel, and core apples.

2. Pour water into saucepan. Add the apple pieces.

3. Turn the burner to medium-high heat until the water starts to boil. Lower the heat to medium-low to simmer the apples, covering the saucepan partly with a lid.

4. While simmering the apples, gently stir them until they begin to break down. While the original recipe estimated this process to take 40 minutes, using Macintosh apples it took about 20 minutes.

5. Remove the saucepan from the heat and use a potato masher to mash the apples into a thick sauce.

6. Stir in the cinnamon.

7. Enjoy!


Nutritional Info per Serving:
Calories 55; Total Fat 0g; Cholesterol 0mg; Sodium 0mg; Total Carbs 14g; Protein 0g

Shepherd's Pie

Disclaimer: this is not a traditional English shepherd's pie, but it's just as tasty. The spice combination gives it a unique flavor, which I have enjoyed for several years since first discovering this recipe.

Shepherd's Pie
Adapted from Emeril Lagasse's "There's a Chef in My Family" 
6 servings

Ingredients:
2 lbs potatoes, peeled and cut into 1 inch cubes
2 tsp salt
4 tbsp unsalted butter
1/2 cup milk
1/4 cup heavy cream
1/4 tsp plus 1/8 tsp ground black pepper
1 tbsp vegetable oil
2 medium onions
4 cloves minced garlic
1 1/2 lbs ground beef (I used 80% lean)
3/4 tsp Italian seasoning
1/4 tsp thyme leaves
1/4 tsp ground cinnamon
1/8 tsp ground cloves
1 tbsp all-purpose flour
1 1/4 cup beef broth (I used the full 14.5 oz container, which is roughly 2 cups, but that does make the pie more liquidy)
3/4 cup diced carrots
2/3 cup frozen peas (do not thaw)
2/3 cup frozen corn kernels (do not thaw)
2 tsp tomato paste (optional)
1/2 cup grated cheddar cheese (roughly 2 oz)

1. Preheat oven to 375F degrees.

2. In a medium saucepan, place the potatoes and 1 tsp of the salt. Fill with just enough water to cover the potatoes. Bring to a boil over high heat.

3. Reduce heat to medium and cook until fork tender, about 12-15 minutes.

4. While the potatoes are cooking chop the onions and mince the garlic. Fun fact: you can freeze onions by mistake! I inadvertently did this while away in Boston and came back to a whole bag of frozen onions, but do not despair, they are still usable in recipes such as these. The only catch is that you can't defrost them or they'll go mushy, so instead just chop them while frozen and prepare a splatter shield for when you add them to the hot oil. Also, the easiest way to mince the garlic is to first remove it from its outer shell, which is best done by crushing it under the flat side of a kitchen knife, as demonstrated below. Once removed from its shell, you can mince the garlic in three ways: by hand (old school), with a small food processor, or with a garlic press. I used a garlic press, and if you don't have one I would highly recommend them, as it made the job so much easier.

Place the garlic clove under the knife
Gently apply pressure with your hand, until you hear and feel the garlic shell break.
5. At this point the potatoes should be done cooking. Turn off the stove and remove them from the pot, placing them in a medium mixing bowl. Add the butter, milk, heavy cream, 1/2 tsp of the salt, and 1/8 tsp of the black pepper. Mash with a potato masher for chunky potatoes, or use an electric mixer for smoother ones. Once done, set aside.

6. In a large skillet or pot, heat the vegetable oil over medium-high heat. Add the onion and cook until soft.

7. Add the garlic and cook for roughly 30 seconds before adding the ground beef. Break up the beef until it is cooked through.

8. Once the meat is done cooking, gently remove some of the excess fat from the pot. This is best done by turning off the stove, gently tilting the pot to one side, and soaking up the excess fat with paper towels. Once most of the fat is removed, return the pot to medium-high heat.

9. Add the Italian seasoning, thyme, the remaining 1/2 tsp salt, the remaining 1/4 tsp black pepper, cinnamon, and cloves. Stir to mix-in all of the spices.

10. Sprinkle the meat with the flour, stirring once or twice.

11. Add the beef broth, carrots, peas, corn, and tomato paste. Stir to combine and bring to a boil.

12. Reduce the heat to medium-low and simmer until thickened.

13. Transfer the meat mixture to a 2-5 quart casserole or baking dish and spoon the mashed potatoes evenly over the top.

Note the sheet pan under my casserole dish. If your pie looks like it might boil over in the baking process, make sure to place it on a baking sheet to avoid a huge mess/possibility of a fire.
14. Sprinkle with cheese and bake for 30 minutes, or until golden on top. To get a nice crisp golden brown top you might need to use the broiler for the last 4-6 minutes, depending on your oven. I was fine without the broiler.

15. Enjoy!


Fun Fact: Emeril signed my book! Well, actually my family's book, but I took it from them since they weren't putting it to good use.

Nutritional Info per Serving:
Calories 588; Total Fat 39g; Cholesterol 125mg; Sodium 1167mg; Total Carbs 32g; Protein 28g